

英文:
How can reproduce animation for rolling window over time?
问题
I'm here to help with the Chinese translation. Here is the translated content:
我正在尝试使用一维时间序列数据,并尝试通过GoogleColab笔记本上的自己的数据复现以下方法的动画效果。
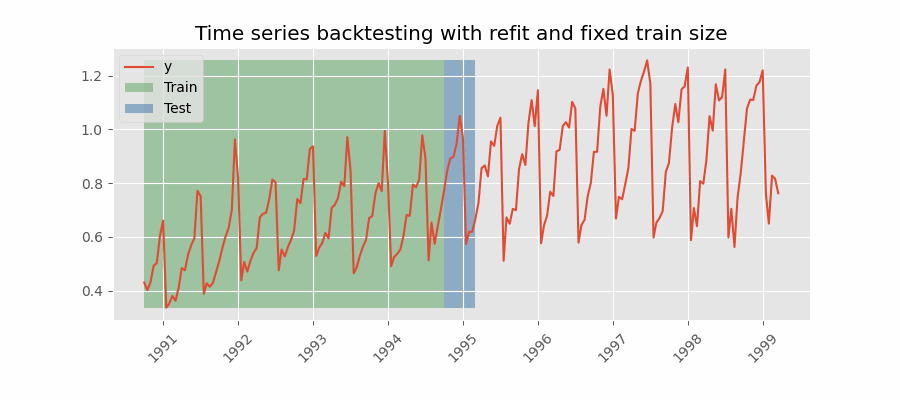
这是关于复现STS转换的动画(由series_to_supervised()函数实现,具有回溯步骤到过去时间n_in=9)等于使用重新拟合和固定训练大小(滚动起源)进行回测动画方法,由[tag:SkForecast]包引入。更多关于train和test选择的内容,是关于实际时间序列数据y的。可视化固定的训练大小,重新拟合并预测下一步。
import numpy as np
import pandas as pd
import matplotlib.pyplot as plt
from matplotlib.patches import Rectangle
from matplotlib.animation import FuncAnimation
from IPython.display import HTML
print(pd.__version__)

# 生成一维时间序列数据到pandas DataFrame
import numpy as np
np.random.seed(123) # 为了可重复性和获得可重复的结果

df = pd.DataFrame({
    "TS_24hrs": np.arange(0, 274),
    "count": np.abs(np.sin(2 * np.pi * np.arange(0, 274) / 7) + np.random.normal(0, 100.1, size=274)) # 生成季节性数据
})
# df = pd.read_csv('/content/U2996_24hrs_.csv', header=0, index_col=0).values
print(f"原始数据 {df.shape}")

# 可视化数据
import matplotlib.pyplot as plt
fig, ax = plt.subplots( figsize=(10,4))

# 绘制数据
df['count'].plot(label=f'数据或y', c='red')
plt.xticks([0, 50, 100, 150, 200, 250, df['TS_24hrs'].iloc[-1]], visible=True, rotation="horizontal")

plt.legend(bbox_to_anchor=(1.04, 1), loc="upper left")
plt.title('数据图')
plt.ylabel('count', fontsize=15)
plt.xlabel('时间戳 [24小时]', fontsize=15)
plt.grid()
plt.show()

# 使用series_to_supervised (STS)选择训练/测试数据
from pandas import DataFrame, concat
def series_to_supervised( data, n_in, n_out=1, dropnan=True):
    """
    将时间序列构建成监督学习数据集。
    参数:
        data: 观测序列的序列,可以是列表或NumPy数组。
        n_in: 输入的滞后观测数量 (X)。
        n_out: 输出的观测数量 (y)。
        dropnan: 是否删除包含NaN值的行。
    返回:
        用于监督学习的Pandas DataFrame。
    """
    n_vars = 1 if type(data) is list else data.shape[1]
    df = pd.DataFrame(data)
    cols = list()
    # 输入序列 (t-n, ... t-1)
    for i in range(n_in, 0, -1):
        cols.append(df.shift(i))
    # 预测序列 (t, t+1, ... t+n)
    for i in range(0, n_out):
        cols.append(df.shift(-i))
    # 组合在一起
    agg = concat(cols, axis=1)
    # 删除包含NaN值的行
    if dropnan:
        agg.dropna(inplace=True)
    return agg.values

values = series_to_supervised(df, n_in=9)
data_x, data_y = values[:, :-1], values[:, -1]

print(data_x.shape)
print(data_y.shape)

# 定义动画函数
import matplotlib.pyplot as plt
import pandas as pd
from matplotlib.animation import FuncAnimation

fig, ax = plt.subplots(nrows=1, ncols=1, figsize=(40, 8))
plt.subplots_adjust(bottom=0.25)
plt.xticks(fontsize=12)
ax.set_xticks(range(0, len(data_y), 9))
ax.set_yticks(range(0, 2500, 200))

data_y = pd.Series(data_y)
data_y.plot(color='r', linestyle='-', label="y")
ax.set_title('时间序列')
ax.set_xlabel('时间')
ax.set_ylabel('数值')
ax.legend(loc="upper left")
ax.grid(True, which='both', linestyle='-', linewidth=3)
ax.set_facecolor('gainsboro')

ax.spines['bottom'].set_position('zero')
ax.spines['left'].set_position('zero')
ax.spines['right'].set_color('none')
ax.spines['top'].set_color('none')

nested_list = list(trainX_tss)
lines = [ax.plot([], [], color='g', linestyle='-')[0] for _ in range(len(trainX_tss))]

def init():
    for line in lines:
        line.set_data([], [])
    return lines

def update(frame):
    for i, line in enumerate(lines):
        data = pd.Series(nested_list[i], index=range(frame + i, frame + i + 9))
        line.set_data([], [])
        line.set_data(data.index, data)
    return lines

# 定义动画设置
anim = FuncAnimation(fig, update,
                    frames=len(nested_list) - 9,
                    init_func=init,
                    interval=500,
                    blit=True,
                    repeat=False)

# 保存动画 (.gif)
anim.save('BrowniamMotion.gif', writer="pillow", fps=10 )

# 在GoogleColab笔记本中可视化动画
# 抑制最终输出
plt.close(0)
HTML(anim.to_html5_video())
多步骤或序列预测
一种不同类型的预测问题是使用过去的观测来预测一系列未来的观测。这可能被称为序列预测或多步骤预测。
到目前为止,我能够得到如下的输出,但它非常丑陋
英文:
I'm experimenting with 1D time-series data and trying to reproduce the following approach via animation over my own data in GoogleColab notebook.
It's about reproducing the animation of STS transformation (implemented by series_to_supervised() function with Lookback steps to past time n_in=9) equal to Backtesting with refit and fixed training size (rolling origin) animation approach introduced [tag:SkForecast] package. It's more about train and test selection over actual time-series data y. Visualize fixed train size and refit and predict next step(s).
import numpy as np
import pandas as pd
import matplotlib.pyplot as plt
from matplotlib.patches import Rectangle
from matplotlib.animation import FuncAnimation
from IPython.display import HTML
print(pd.__version__)


# Generate univariate (1D) time-series data into pandas DataFrame
import numpy as np
np.random.seed(123) # for reproducibility and get reproducible results

df = pd.DataFrame({
    "TS_24hrs": np.arange(0, 274),
    "count"   : np.abs(np.sin(2 * np.pi * np.arange(0, 274) / 7) + np.random.normal(0, 100.1, size=274)) # generate sesonality
})
#df = pd.read_csv('/content/U2996_24hrs_.csv', header=0, index_col=0).values
print(f"The raw data {df.shape}")
#print(f"The raw data columns {df.columns}")


# visulize data
import matplotlib.pyplot as plt
fig, ax = plt.subplots( figsize=(10,4))

# plot data
df['count'].plot(label=f'data or y', c='red' )
#df['count'].plot(label=f'data',  linestyle='--')
plt.xticks([0, 50, 100, 150, 200, 250, df['TS_24hrs'].iloc[-1]], visible=True, rotation="horizontal")

plt.legend(bbox_to_anchor=(1.04, 1), loc="upper left")
plt.title('Plot of data')
plt.ylabel('count', fontsize=15)
plt.xlabel('Timestamp [24hrs]', fontsize=15)
plt.grid()
plt.show()

# slecet train/test data using series_to_supervised (STS)
from pandas import DataFrame, concat
def series_to_supervised( data, n_in, n_out=1, dropnan=True):
    """
    Frame a time series as a supervised learning dataset.
    Arguments:
        data: Sequence of observations as a list or NumPy array.
        n_in: Number of lag observations as input (X).
        n_out: Number of observations as output (y).
        dropnan: Boolean whether or not to drop rows with NaN values.
    Returns:
        Pandas DataFrame of series framed for supervised learning.
    """
    n_vars = 1 if type(data) is list else data.shape[1]
    df = pd.DataFrame(data)
    cols = list()
    # input sequence (t-n, ... t-1)
    for i in range(n_in, 0, -1):
        cols.append(df.shift(i))
    # forecast sequence (t, t+1, ... t+n)
    for i in range(0, n_out):
        cols.append(df.shift(-i))
    # put it all together
    agg = concat(cols, axis=1)
    # drop rows with NaN values
    if dropnan:
        agg.dropna(inplace=True)
    return agg.values


values=series_to_supervised(df, n_in=9)
data_x,data_y =values[:, :-1], values[:, -1]

print(data_x.shape)
print(data_y.shape)


# define animation function
import matplotlib.pyplot as plt
import pandas as pd
from matplotlib.animation import FuncAnimation

fig, ax = plt.subplots(nrows=1, ncols=1, figsize=(40, 8))
plt.subplots_adjust(bottom=0.25)
plt.xticks(fontsize=12)
ax.set_xticks(range(0, len(data_y), 9))
ax.set_yticks(range(0, 2500, 200))

data_y = pd.Series(data_y)
data_y.plot(color='r', linestyle='-', label="y")
ax.set_title('Time Series')
ax.set_xlabel('Time')
ax.set_ylabel('Value')
ax.legend(loc="upper left")
ax.grid(True, which='both', linestyle='-', linewidth=3)
ax.set_facecolor('gainsboro')

ax.spines['bottom'].set_position('zero')
ax.spines['left'].set_position('zero')
ax.spines['right'].set_color('none')
ax.spines['top'].set_color('none')

nested_list = list(trainX_tss)
lines = [ax.plot([], [], color='g', linestyle='-')[0] for _ in range(len(trainX_tss))]

def init():
    for line in lines:
        line.set_data([], [])
    return lines

def update(frame):
    for i, line in enumerate(lines):
        data = pd.Series(nested_list[i], index=range(frame + i, frame + i + 9))
        line.set_data([], [])
        line.set_data(data.index, data)
    return lines


# define animation setup
anim = FuncAnimation(fig, update,
                    frames=len(nested_list) - 9,
                    init_func=init,
                    interval=500,
                    blit=True,
                    repeat=False)


# Save animation (.gif))
anim.save('BrowniamMotion.gif', writer = "pillow", fps=10 )

# visulize animation in GoogleColab Notebook
# suppress final output
plt.close(0)
HTML(anim.to_html5_video())
STS transformation:
> Multi-Step or Sequence Forecasting
A different type of forecasting problem is using past observations to forecast a sequence of future observations. This may be called sequence forecasting or multi-step forecasting.
So far, I could reach this output which is so ugly and incorrect.
![]()

答案1
得分: 0
在您想要的动画中,只有绿色和蓝色的矩形在移动,数据保持不变。因此,您的 update() 函数应该反映这一点。
所以您需要设置初始图形以您期望的方式,创建您想要动画的部分(使用 init()),然后使用 update() 创建帧:
import numpy as np
import matplotlib.pyplot as plt
from matplotlib.animation import FuncAnimation
from matplotlib.patches import Rectangle
import pandas as pd
from IPython.display import HTML

# 创建数据
df = pd.DataFrame({
    "TS_24hrs": np.arange(0, 274),
    "count": np.abs(np.sin(2 * np.pi * np.arange(0, 274) / 7) + np.random.normal(0, 100.1, size=274))  # 生成季节性数据
})

# 创建绘图
plt.style.use("ggplot")  # <-- 设置整体外观
fig, ax = plt.subplots(figsize=(10, 4))

# 绘制数据
plt.plot(df['TS_24hrs'], df['count'], 'r-', linewidth=0.5, label='data or y')

# 使图形更美观
plt.plot([], [], 'g-', label="Train", linewidth=8, alpha=0.3)  # <-- 虚拟图例项
plt.plot([], [], 'b-', label="Test", linewidth=8, alpha=0.3)   # <-- 虚拟图例项
plt.xticks([0, 50, 100, 150, 200, 250, df['TS_24hrs'].iloc[-1]], visible=True, rotation="horizontal")

plt.title('数据绘图')
plt.ylabel('count', fontsize=15)
plt.xlabel('时间戳 [24小时]', fontsize=15)
plt.grid(True)
plt.legend(loc="upper left")
fig.tight_layout(pad=1.2)

Y_LIM = 280
TRAIN_WIDTH = 25
TEST_WIDTH = 10

def init():
    rects = [Rectangle((0, 0), TRAIN_WIDTH, Y_LIM, alpha=0.3, facecolor='green'),
             Rectangle((0 + TRAIN_WIDTH, 0), TEST_WIDTH, Y_LIM, alpha=0.3, facecolor='blue')]
    patches = []
    for rect in rects:
        patches.append(ax.add_patch(rect))
    return patches

def update(x_start):
    patches[0].xy = (x_start, 0)
    patches[1].xy = (x_start + TRAIN_WIDTH, 0)
    return patches

# 创建 "Train" 和 "Test" 区域
patches = init()

ani = FuncAnimation(
    fig,
    update,
    frames=np.linspace(0, 230, 40),  # 所有起始点
    interval=500,
    blit=True)

HTML(ani.to_html5_video())

英文:
In the animation you want, only the green and blue rectangles move and the data is constant. So your update() function should reflect it.
So what you need is to set up initial graph the way you desire, create the parts you want to animate (with init()) and then create frames using update():
import numpy as np
import matplotlib.pyplot as plt
from matplotlib.animation import FuncAnimation
from matplotlib.patches import Rectangle
import pandas as pd
from IPython.display import HTML

# create data
df = pd.DataFrame({
    "TS_24hrs": np.arange(0, 274),
    "count"   : np.abs(np.sin(2 * np.pi * np.arange(0, 274) / 7) + np.random.normal(0, 100.1, size=274)) # generate sesonality
})

# create plot
plt.style.use("ggplot")  # <-- set overall look
fig, ax = plt.subplots( figsize=(10,4))

# plot data
plt.plot(df['TS_24hrs'], df['count'], 'r-', linewidth=0.5,  label='data or y')

# make graph beautiful
plt.plot([], [], 'g-', label="Train", linewidth=8, alpha=0.3) # <-- dummy legend entry
plt.plot([], [], 'b-', label="Test", linewidth=8, alpha=0.3)  # <-- dummy legend entry
plt.xticks([0, 50, 100, 150, 200, 250, df['TS_24hrs'].iloc[-1]], visible=True, rotation="horizontal")

plt.title('Plot of data')
plt.ylabel('count', fontsize=15)
plt.xlabel('Timestamp [24hrs]', fontsize=15)
plt.grid(True)
plt.legend(loc="upper left")
fig.tight_layout(pad=1.2)

Y_LIM = 280
TRAIN_WIDTH = 25
TEST_WIDTH = 10

def init():
    rects = [Rectangle((0, 0), TRAIN_WIDTH, Y_LIM, alpha=0.3, facecolor='green'),
             Rectangle((0 + TRAIN_WIDTH, 0), TEST_WIDTH, Y_LIM, alpha=0.3, facecolor='blue')]
    patches = []
    for rect in rects:
            patches.append(ax.add_patch(rect))
    return patches

def update(x_start):
    patches[0].xy = (x_start, 0)
    patches[1].xy = (x_start + TRAIN_WIDTH, 0)
    return patches


# create "Train" and "Test" areas
patches = init()

ani = FuncAnimation(
    fig,
    update,
    frames=np.linspace(0, 230, 40),  # all starting points
    interval=500,
    blit=True)


HTML(ani.to_html5_video())
通过集体智慧和协作来改善编程学习和解决问题的方式。致力于成为全球开发者共同参与的知识库,让每个人都能够通过互相帮助和分享经验来进步。
评论